
What is Zoho Creator | The Basics | Design & Share Custom Forms
Welcome back ! I believe that by now, you would have your zoho creator login so as to proceed further. I will not be surprised if some of you have already started to explore its interface, get to know the workspace etc. Way to go !..
So, lets start from the beginning. As I have mentioned in my previous post, Zoho creator allows you to create forms & store the data obtained via these forms, and also do scores of other things. Before we start on those, it is essential to know the elements associated with zoho creator. This is get used to the terminologies. But before you start, open up Zoho Creator and login with your User ID and Pwd in another tab / window.
Applications :-
It is much easier to realate Zoho Creator Applications as Excel work books. Understand that you are allowed to create only 10 Applications (~workbooks~ notice the red bar on the top that says this) with free membership. However, with paid membership, you can have unlimited applications. From what I have seen, 10 applications are more than sufficient for individuals and small business owners.
Inorder to create an application, use the Create New Application link in your dashboard.

Lets start off by naming it as “My Personal Application”. As we progress with this zoho creator series, we will be using this application to add forms and do other stuff.
Zoho creator allows you to create 10 applications for free. Please lend me one, during the course of this zoho creaor series.
Forms :-
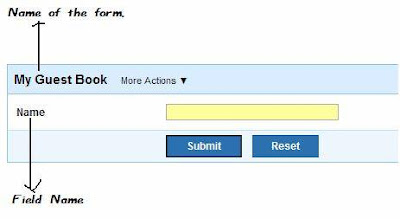
After creating the application , you will be automatically redirected to the My Guest book – form area where you can design your form. Although we will be seeing this in details in the upcoming posts, lets start of with a single field.
Do you notice the INSERT FIELDS in the left & Drag and Drop fields on the right. … So it would be appropriate to say here that You are in the EDIT MODE of the form.
Add a single line field , & give the Label Name as NAME
For the moment, lets have only one field . We will be adding more fields in the upcoming posts.
Live Mode :- (Run the form)
From here, things begin to get technical. There is no need to get perturbed, you will get used to it in course of time.Now, you have your first form ( with a single field NAME).It is time to use this form to gather date.
Use the ACCESS THIS APPLICATION link in the top to go into the LIVE MODE.This will take you to the LIVE MODE where data is entered into the form.
Go ahead, Enter a few names and click submit. AS soon as you Submit the form, you should notice a message that says “Data added successfully”.
Views :- Where does all the data go ?
Zoho creator uses “VIEWS” to strore the data collected via forms. Views are nothing but tables that are automatically populated with data is added to a form.
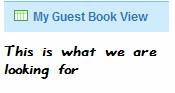 Every form by default has its view. The name is usually [FORM-NAME] & View. Just as in this case “My Guest book View”. The View displays the data only on Live Mode. In the upcoming posts, we will be learning more about how views behave in the edit mode.
Now, that you have located your form’s View, Go ahead and click it. You should be presented with something that looks like this

Lessons Learnt :-
- Create a new application & name it as “My Personal Application”.
- Create a new form & name it “My Guest book”.
- Add a single line field to above form and name it “NAME” — This happens in the edit mode of the form
- Use the ACESS THIS APPLICATION link to go into the LIVE MODE
- Add data into the form and click submit… “Data submitted successfully” confirms the submission
- Locate the view that is autogenerated for the form , It is named as “[ FORM NAME ] & View”
- See the data entered via form in a tabular format.
Things to Remember.
- Zoho allows 10 free applications
- One application can have any number of forms.
- Data can be entered only in Live mode
- Entered Data can be seen only Live mode …. Use VIEWs for seeing the data.
- You can also Add / edit / delete data from the views directly.
It might take a while for the information here to sink it. If you feel overwhelmed, take a break and come back again. I assure you, once you get the hang of things, it will be next to impossible to let go. Your time will be worth every second while you aclamatise yourself with zoho creator.
Feel free to share your thoughts, I shall be gald to respond.
Your appreciation is my motivation
What is Zoho Creator | The Basics | Design & Share Custom Forms
Looks simple for a great application. Like a obedient student, I have created my ID and installed one app too…it was a breeze.
You have written it very well…Please go ahead and publish a book.
By the way, please pick up your special award and appreciation….
…from my blog 😉
Hi Kumar.
//Like a obedient student, I have created my ID and installed one app too//
!!!Good Boy !!!
Once you get a hang of things, even scripting is intutive. Thanks for the award and your wishes on publishing a book. Hmm.. seems good.. but .. let see.
Regards.