Discourteous chivalry
Heartless solace
‘Why ? ‘ asks my echo
Encouraging nudge
Consoling silence..defines
‘Friends’..says my echo


Homeprenuer®, Entrepreneur working from home.
Professional Working From Home
Discourteous chivalry
Heartless solace
‘Why ? ‘ asks my echo
Encouraging nudge
Consoling silence..defines
‘Friends’..says my echo
They fly down with grace,
They lay down for days,
To brace a child’s fall,
To embrace a staggering foot.
Not all of us are happy with the image that blogger gives for the header.. sometimes it doesn’t fit well with the concept of the blog…. and searching the internet for a relevant picture that conveys the idea behind your blog(Title) is time consuming and cannot guarantee success.
You may have a certain collection of pictures… when put together might give a boost to the appearance of your blog… but don’t know how to go about it… Never mind.. just read the instructions and you will have your own custom header… Checkout the Header here
Just for starters.. I have two images here.
JUST 4 PICS PUT TOGATHER…. NO SPECIAL EFFECTS-
Here…I HAVE MERGED THEM TO GIVE A SINGLE-PIC-LOOK
The idea is to combine the 4 pictures and create a new one that appears to be a single picture…. I have used 20 images to create a custom header for My Photoblog.. check it out
I have used Photoshop to achieve this effect.. Few important guidelines before going about creating your custom collage
PHASE-1
 .. this will alter the width of the picture
 .. this will alter the height of the picture
 .. will alter the width & height at the same time
PHASE 2—–INSTRUCTIONS TO CREATE YOUR COMPOSITE HEADER
|

 in the layer palette to
  add the layer mask
 … if you see a pencil the
 … click on the down arrow to adjust the diameter of the brush…ie…
 make the brush large / small

Hope I have included every conceivable obstacle that you might face… incase I have missed out any do let me know by dropping a word at the comment section.. Once you get the feel of working with Layer Masks… there is no stopping at the effects you can achieve in matter of minutes. I insist that you experiment with the procedure listed above by choosing 2 pictures and merging them as one… by using layer masks…
Once your Eyes & hands work in synchronization … then you can go about merging ‘n’ number of pictures to give yourself a customized image that can be used in the header – background .. or just plain composite image .
If this post has been helpful to you.. do drop a word of appreciation. Your appreciation is my motivation
Gazing out of the windowpane,
Your eyes wilt in pain.
Looking at the world pass by,
Yet.. seeing only your world stand by .
The mirth and merry the toddler once filled,
Still lingers in your eyes and air around the ears,
Fluttering feet’s tapping loud …in tantrum,
Fills our day with not a moment to spare.
You nurtured them well.. with care and concern,
You nourished them well.. with wisdom profound,
You taught them well… with the ways of world,
You wish them well.. with every whiff of wind.
Flying away from mother-Goose’s nest,
To build a nest and.. call it their own.
Farther how much ever they be in the world, wide,
Not farther than a thought .. for thought flies faster than wings.
Exploring the depth of emotions,
Engulfed in glimpse that anchors your glance,
Experiencing the eternal presence,
Enlightened with new zest
Encompassed by new breath,
Enveloped by new delight.
Blogger has introduced its Search Widget so that we can search for terms that are not included in Labels but could be present in the posts. Just like any other widget, you may drag and drop this at any position at the Template – page elements section. Here I shall giving you some self-help instructions so that you can customize the appearance of the widget and the result to suit your blog’s color schema. Before I get into the widget-code and details of style sheet… let see which part related to which section of the code. Its possible to customize everything that appears here… however… I am going to emphasis mainly on the Tabs & Results pane
Once you add a search widget to the blog form the page elemets.. and see the HTML of the widget you will notice that
<div class=’widget-content’ style=’width:95%’>
<div expr:id=’data:widget.instanceId + “_form”‘>
<span class=’cse-status’><data:loadingMsg/></span>
</div>
<div class=’widget-content’ style=’width:95%’> Width =95 % determines that the search box occupied the 95% space of the area where you are placing this widget. Lets say you are keeping this widget in the sidebar .. then the search box & the search button together will occupy the 95% of the sidebar. Play around with this number .. you will see the search box decrease and increase in length accordingly
<div expr:id=’data:widget.instanceId + “_form”‘> Here you will notice “form” which means that the search box and the search button are put togather in a form when this widget was created… and the developer has deiced to make them appear in the same line. So If you feel like putting the search button below the search box.. then I am afraid.. it doesn’t seem to be possible now. However.. we can always play with the width and decide on the optimum width that suits your blog
<data:loadingMsg/>This is something that shows the “LOADING…..” message when the page is being downloaded in the browser… you can delete this tag and add you own custom message as …” Wait..” or something else
If you remember… while configuring the search widget in the Page Elements Section.. you have the options to allow search to be performed amongst the posts / texts in Your Blog – Links that you have given in your blog – The Entire Web. Now the results for these options appear as Tabs ( see pic). Blogger has provided us with the default style sheets for the search widget so that we can modify the appearance of the Tabs & Results ( after all this is what the reader sees after hitting the search button)
The Edit-HTML of your template ( Check the Expand widgets box) will have the following. You can give the color codes of your choice and see the difference it makes in the appearance of the tabs
| For ..ACTIVE Title -TAB | For…INACTIVE Title-TABS |
#uds-searchControl .gsc-tabhActive { border-color:<data:borderColor/>; border-top-color:<data:activeBorderColor/>; background-color:transparent; color:<data:textColor/>; } |
#uds-searchControl .gsc-tabhInactive { border-color:<data:borderColor/>; background-color:transparent; color:<data:linkColor/>; } |
The Results pane is always displayed above all of your blog posts. You will see the following in your template which is responsible for the appearance of the Results in your blog . You may see that I have changed the background color to the value of the pale turquoise color
#uds-searchControl .gsc-results
{
border-color:#cccccc;
background-color:#D7FDFC;
color:black;
}
With a little customization.. the dull looking ( but very effective) search box can be given a total makeover so that it begins to look like a part of your blog.If this post has been helpful you… pass the word and dont forget to link back
Your appreciation is my motivation
You pen your moods with grace ,
Restoring trust and faith in Lord’s Grace,
Restoring faith in humaneness of human race,
Restoring confidence in one’s self,
Restoring poise in efforts of self & others.
This is a dream come true for all the bloggers who are apprehensive to incorporate the “Google Custom Search Box” in their blog.. Where search can be performed exclusively for your blog… Confused.. try searching for something in the Searchbox you see above. Watch how the results are displayed in Tabs..
The Best part is.. the results are displayed separately for easier identification
This is the SearchBox widget being introduced by Blogger_Draft dont worry too much.. Blogger Draft is where blogger introduces its new features for us to try out and give our opinion… following which the widget will be introduced at the regular blogger dashboard
Inorder to be able to use the widgets introduced in draft.. you just need to type draft.blogger.com in your browser..Lo!.. you have your dashboard.. looks the same eh !..
Now go to TEMPLATE – PAGE ELEMENTS- ADD PAGE ELEMENTS… you must be able to see the SEARCH BOX as new widget amongst all other regular widgets

You may move the SearchBox like any other widget… and the results are always displayed at the area just above your blog posts… so that the reader can see them at “eye-level”.. without having to scroll to the end of the page or so
Personally I would prefer to use this than the GoogleCustomSearchBox.. reason being.. i find the customization – incorporation – display of results to be very clumsy ( at least for me)…which is why I never had a search box in my blog all these days. Just try it out.. if you dont like it.. you can always remove the widget… what do you say ? ? ? ?
Your appreciation is my motivation
நம்ம புகைப்படகலை நடுவர்கள் ஆகஸ்ட் மாத போட்டிக்கான முடிவை அறிவிச்சதை எல்லாரும் பார்த்திருபீங்க.. இதை விட ஒரு நல்ல தருணம் இந்த முடிவை அறிவிக்க அவங்க தேற்ந்தெடுத்திருக்க முடியாது.. ஏன்னா இது… புகைப்பட வாாாாாரம்….ஏன்னா…. இன்னைக்கி தான் உலக நிழற்பட நாள் (World Photography day — Aug 19)…
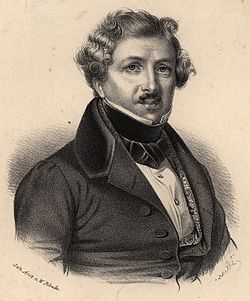
இதுக்கு காரணம் புகைப்பட கலையை நடைமுறை வாழ்க்கையின் அம்சமாக்கிய பிரான்ஸ் நாட்டை சேர்ந்த Louis – Jacques-Mande Dagurre ஆவார்.
| Degurre ஒரு ஓவியர்… அவர் Opera க்கெல்லாம் பின்னணி-ஓவியங்கள் வரைபவர். படங்களின் நடுவே ஒளி ஊடுருவிச் செல்வதை பார்த்து ரொம்பவும் பிரமித்து போனார்.. அந்த நொடியில் படங்கள் ரொம்பவும் அழகாகவும் வித்தாயசமாகவும் காணப்பட்டதை உணர்ந்தார். அந்த க்ஷணத்தை எப்படியாவது பத்திரப்ப்டுத்த வேண்டும்.. அதுக்கு என்ன வழின்னு தேட ஆரம்பித்தார்… |  |
 |
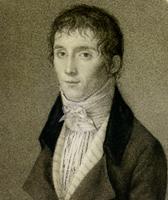
கிட்டதட்ட இதே காலகட்டத்தில் தான் ( 1825-1830) Joseph Nicéphore Niépce ம் (புகைப்படகலை… ன்னு இப்பொ நாம சொல்லறோமே. …அதை குறித்து ) ரொம்ப தீவிரமா ஆராச்சி செய்து வந்தார்… இந்த கலைக்கு அவர் குடுத்த பெயர் heliography … அதாவது “sun writing”… Degurre & Niépce .. கூட்டணி (1829) தான் புகைப்பட கலையின் ஆத்திச்சூடியையே நமக்கு தந்தது… |
இது ஒரு வித்தியாசமான கூட்டணி… Degurre .. ஒரு ஓவியர்… Niépce புத்தகங்கள் – செய்த்தித்தாள் அச்சிடுபவர்… ஒருத்தருக்கு நிறம்-ஒளி-நிழல் போன்ற விஷயத்தில் பாண்டித்தியமென்றால்… இன்னொருவருக்கு கெமிகல்-கலவை-தன்மை-அச்சிடும் முறை ( படத்தை பிரிண்ட் பண்ணணுமில்லே!!!)… இதிலெல்லாம் உஸ்தாத்… ரெண்டு பேருக்கும் ஒரே ஆரவம்… திருப்புமுனை சாதனைகள் எதிர்பார்க்க கூடியது தானே….
ஆரம்ப காலத்திலே அவங்களுக்கும் ரொம்பவும் சவாலா அமைஞ்ச விஷயம்… exposure time … Niépce .. அவருடைய முதல் படத்துக்கு 8 மணி நேரம் exposure time குடுத்தார்ன்னா… நம்ப முடியுதா… ? ? ?இதனாலே… அவரால் கட்டிடம்-மரம் தான் படம் புடிக்க முடிஞ்சுது.. மனுஷங்களை படம்பிடிக்க முடியலை…. 8 மணி நேரம் எவன் போஸ் குடுப்பான்…
இவர் தான் Daguerreotype. ன்னு படமெடுக்கும்்மும் முறையை தந்தவர்…. அந்த காலத்திலே இது பெரும் பரபரப்பை உண்டாக்கியது… இன்னிக்கும் photo printing & developing பண்ணரவங்க ( விஷ
யம் தெரிஞ்சவங்க) கிட்டே கேட்டு பாருங்க… பக்கம்-பக்கமா சொல்லுவாங்க
ரெண்டு பேரும்.. உன் – டெக்னிக் பெரிசா… இல்லை என் – லெக்னிக் பெரிசான்னெல்லாம் சண்டைபோடாமல்… அவங்க – அவங்க research findings ஐ பகிந்துகிட்டதால் தான் இன்னிக்கி நம்மாலெயும் ஏதோ மத்தவங்களுக்கு காட்டுகிரமாதிரி – போட்டிகு அனுப்புர மாதிரி படங்கள் எல்லலாம எடுக்க முடியுது
இது வெறும் ஆரம்ப காலம் தான்.. அப்புறம் படிப்படியா… pin-hole camera லிருந்து முன்னேறி… Film Camera... அப்புறம் இன்னிக்கி digital camera ன்னு பலபேர் புகைப்பட துறையிலே ஆர்வமா இருக்காங்க… சிலபேருக்கு இது வெறும் பொழுதுபோக்கு…( சில பேருக்கு உண்மையிலேயே… இந்த கலை மேல் ஆர்வம்… ஆனால் பல பேருக்கு…நானும் தான்… பிலிம் தான் இல்லையே…. பிரிண்ட் போடுற காசு மிச்சம்..ங்கிர வசதி.. அதனால ஆரவம்)… இன்னும் சில பேருக்கு புகைப்பட கலை & கேமரா தான் அன்னதாதா…. இவங்களை நாம என்னைக்குமே கிண்டல் பண்ண கூடாது…
ஸோ… எல்லா புகைப்பட ஆர்வலர்களுக்கும் இந்த நாள் நினைவில் வச்சிருக்கவேண்டியதில்லையா.. அத்னால் தான் இந்த பதிவு.. எல்லாருக்கும் HAPPY WORLD PHOTOGRAPHY DAY.. க்ளிக்-க்ளிக்-க்ளிக்…:D
As I cast a fleeting glance….
To grasp the spirit of your ode,
My glimpse persists to gaze…
Amazed at the admiration of an inspiration…
Inspiration to breathe in…
Inspiration that breathes within. !!!